Friday, September 29, 2006

Halloween Hexagon Table Quilt


Thanks to Doodlebug Gail of Quite Quilted fame I was inspired to make this Halloween Hexagon Table Quilt.

Thank you to Evelyn aka Starfishy of Scrappy Happy Quilts fame for the tutorial on "How to Make Octagon Flowers. This was a useful reference in making this quilt top.

This was my reward today for working on a particularly challenging customer quilt. Sometimes when we are feeling challenged by a project or we are working outside of our comfort zone we need a little incentive to keep pushing forward. Today as I worked on the customer quilt I alternated between it and working on this long anticipated Halloween project. This project was quick, fun, and served as my reward.

It is complete to the flimsy stage and will hopefully be sandwiched and quilted tomrorow. It will be quilted simply so that it can grace the dining room table well in advance of Halloween.

Wednesday, September 27, 2006

Stack'N Whack Christmas - Completed to Flimsy Stage

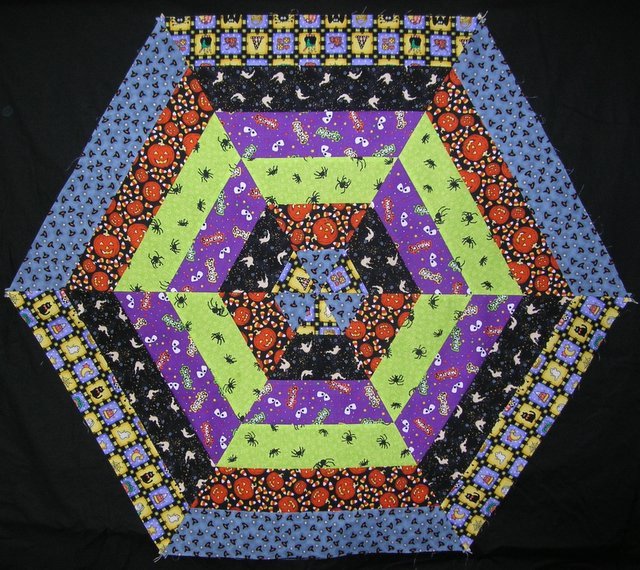
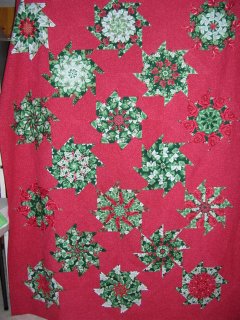
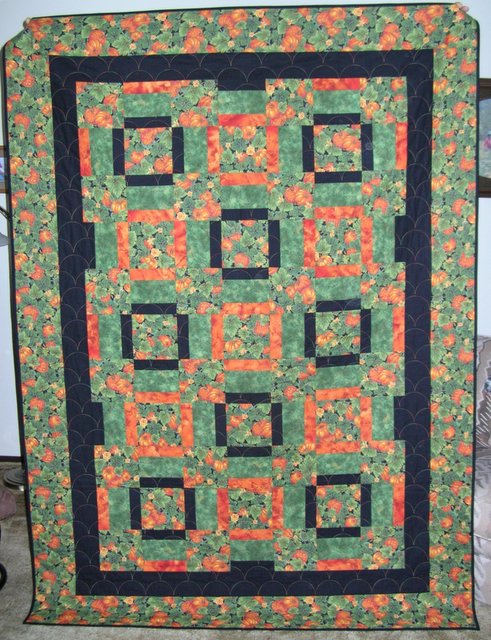
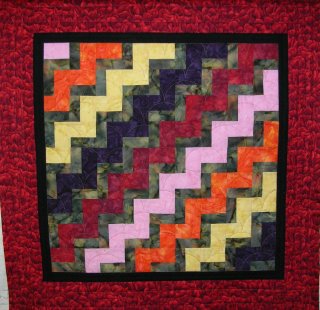
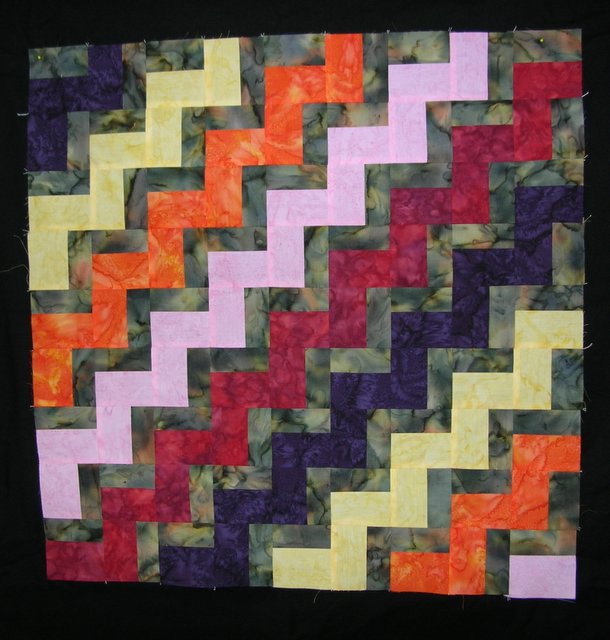
The borders are finally completed on this monster. I thought I would never get this one done. This is my Stack'N Whack Christmas quilt, completed to the flimsy stage. I have been trying to get the borders onto this quilt in between helping the "painter" all week. This quilt ended up 89 1/2 " wide by 111" long.

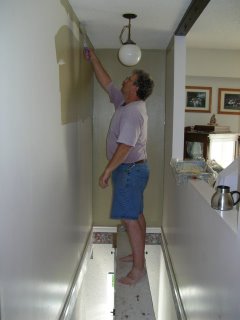
I finished stitching the last border after supper tonight and headed upstairs. I called out, "I need help." Silence followed. The TV was going but no one was in front of it. I knew that my husband and daughter were home, but they were very, very quiet. I had to leave shortly to attend a meeting about the quilt show we are putting together for our guild this fall so I didn't have time to do much searching. I improvised by pinning the quilt to the deck lattice and taking the picture from the ground. The light is not the best, the sun was getting low and so the lower part of the quilt is in shadows from the tree in the back yard.

Miraculous that after the picture was taken the quilt "helpers" materialized. My husband says my mistake was saying that I needed help. He said if I really needed his help, I would have sought him out and found him. How would I have suspected that he was in the office, light off, in front of the computer? Was the TV left going to throw me off the trail? Not to worry, I am not easily discouraged. I can come up with plan B at the drop of a hat--after all, I am a mother! I am used to solving problems for others!


I have been asked to post again about what a flimsy is. Flimsy is a nicer way to say, UFO. However, not just any UFO qualifies as a flimsy. A UFO that has been completed to the stage where the next step would be to sandwich and quilt it is a flimsy.

One of our guild members was on the ferry traveling to Vancouver Island one time when she encountered some quilters from another guild on the ferry traveling to the same quilt show that she was. They were responsible for telling her what a flimsy was. She came back to our guild meeting and asked us at guild meting one night if we could define the term, "flimsy". Of course none of us had ever heard that term before. She went on to describe flimsy as a completed quilt top before it is quilted. Now doesn't that sound a little better than, UFO?

I think quilters are great--we can justify just about anything. Look at how many UFOs most of us have on the go at once and we still manage to justify starting something new. Look at how much fabric we have hoarded, I mean, "stashed" and yet we continue to search for that special fabric. And to top it off we create new words and language at the drop of a hat to describe our craft and keep it mysterious to non-quilters. Do you speak, quilter? Posted by Picasa

Monday, September 25, 2006

Painting and Quilt Studio Treasures

There hasn't been much quilting going on in this house lately. I am still working on the borders for that Stack'N Whack. It is a good job no one is paying me by the hour to finish that quilt because they would never afford it when I am done!

These are two pictures of my husband painting the stair well. It made me nervous to see him on his homemade scaffolding as he painted. My husband paints and I clean up after him. The arrangement seems to be working.

This has proven to be the perfect opportunity to sort through things in the hall closets and thoroughly clean and wash things in and on top of cabinets as they are put back in their places. Some things will never be returned--they will just be discarded.
You can really see the contrast in the old wall colour - white - and the new paint. Quite a change!


What you can't see in this second picture is the ladder that is holding up the plank on the far end. The plank is balanced on the top of the ladder on one end and on the upstairs floor on the nearest end. Notice the coffee cup--never too far away!

Others have not only shown us their pincushions, but have shown us the other treasures in their quilt studios as well. These are three little Hallmark Christmas ornaments that my mother has given me over the years. Each one has a "quilty" theme so I don't want to put them away after Christmas. These ornaments live in my quilt studio year round.

Saturday, September 23, 2006

Christmas Stack'N Whack

Today I have been working at putting together the Stack'N Whack blocks that I made over a year ago. The blocks are now all together and the sides are squared up - ready for borders. If all goes well, I should be able to put on the borders tomorrow.


We are also painting the living areas of the house - living room, dining room, hallway, and stairwell. The walls were previously an off white--very boring. I chose an olive green to paint the walls. The colour is called, Moselle and is General Paint number 8184. I wanted the darker, 8185 Ardmore Green. My choice was a little too much for my husband--he thought the colour was too dark. We compromised and went with the colour that was one shade lighter (8184). My husband has agreed that after we have finished painting all the walls but one, we can decide if we want to paint that last wall a shade darker--8185. I think that is a fair compromise. The walls are turning out fabulous.

Friday, September 22, 2006

Pincushions

Everyone seems to be showing pictures of their pincushions, so I will join in too.

These are the three pincushions that I currently use. The black and gold round one on the left was a pincushion that we made in a workshop at our Guild one evening. The workshop was to teach us how to work with wool. The cushion is filled with lizard sand to keep pins sharp. The top of the cushion is four gold hearts on a round base. I bought the ladybug and added it as a personal touch. Each heart organizes one of my pin types. The ladybug keeps track of the needles.

The silver pincushion in the center of the picture is not a pincushion at all. It is a magnetic dish used by mechanics to keep track of bolts and such when they are working on motors. It has a huge magnet as a base. I use this dish to keep my corsage pins that I use on the long arm. The "arms" or rollers on the long arm are metal and this dish sticks very neatly to the long arm as I am either pinning on a quilt or removing it. Very slick! My dad is a retired mechanic. I had a hard time finding one of these bowls. When I mentioned to him that I was looking for one, he knew exactly where to find me one. Thanks Dad!

The chicken pincushion on the right was a gift from a quilting friend. I use this pincushion to store safety pins. I no longer pin my quilts but there always seems to be a need for a safety pin in this house. Since the safety pins never seem to make it back to their container, I started just sticking them into the chicken. We always know where to find a safety pin now.

Update: Several people have asked what lizard sand is. Lizard sand can be purchased from your local pet store. It is merely sand that has been screened and cleaned so that it is suitable for housing your pet lizard in your aquarium. Because it has been sterilized for the lizards, it is perfect for our pincushion--no bugs or surprises in this sand.

Monday, September 18, 2006

BQ Pumpkin Quilt

I finished my BQ quilt. This top is not yet quilted and I have pinned it to the quilt hanging in my entrance so the picture shows the edge of my sunflower quilt peeking out around the edges.

This top finished at 48 1/2" square. This pattern goes together quickly and is very fun to do. When I cut the pieces out for this top, I cut an equal number of pieces to finish a second top. One of the quilts will go to my mother and the second one will stay at my house. Posted by Picasa

Sunday, September 17, 2006

What is on the shelf?

If you look at the previous post you will see that there is a shelf above the sunflower quilt in our entrance. LindaJ spotted some items up there and was curious to know what they were. So, here is a closer look.

The first two items belonged to my husband's great-grandfather. They are woodworking tools used to plane lumber. They are made from wood and are well worn.


The next item is an old scale, confiscated from a discard pile somewhere. This was not an item passed down through our families--just interesting and old.


The next two items are from my grandfather and are irons. I have tipped the one on the left on its side so you can get a view from the top. These irons were used before electricity and were heated up on the old wood stoves of the day then applied to clothing to remove wrinkles.

This is a metal crayon box. This came from my great aunt Eva who was a school teacher.


This bell was from my grandmother who was also a school teacher. This is what the teachers in the small one room schools on the prairies rang to let the students know it was time for class.

My husband and I enjoy old things, aka antiques. I don't like just any old things, I prefer old things that belonged to members of my family. I currently seem to be the only one in my family who really enjoys this old stuff so I have become the curator of the family museum. I often end up with items that someone feels should be preserved, but which that person does not want to store. I don't mind, it makes for an interesting home.

Saturday, September 16, 2006

Fall Quilts

As you enter my house through the front door, there are two spots to hang quilts. I like to change the quilts with the seasons. I have taken down the summer quilts and replaced them with these fall themed quilts. This quilt was finished in 1999 and shown on a post on March 6, 2006.


This quilt is called, Moonlight Over the Pumpkin Patch and was finished in November 2000. The pattern for this quilt can be found in the Fall/Holiday 1997 edition of Quick Quilts.

Pumpkin Quilt for Fall

The weather has definitely changed. When we left for Vegas on Sept. 8, the weather was still warm and summer like. We returned to rain and 62 degrees on Sept. 13. We are definitely into Fall weather.

A change in seasons triggers a changing of the quilts in my house. This quilt is my pumpkin quilt. I finished it last September.

The pattern is called, "Warm Wishes" and was in the Nov/Dec, Issue #64 of Quiltmaker magazine.
Posted by Picasa

Friday, September 15, 2006

Creative Inspiration in Vegas

The following pictures are photos of the inspiration items I brought back from our recent vacation to Las Vegas. At every turn, there were colours, textures, and designs to inspire the creative spirit. Yes, there is more to Las Vegas than gambling!

The 2,000 hand-blown glass flowers on the ceiling of the Bellagio Hotel.


The floor tiles of the Venetian reminded me of a Tumbling Blocks quilt.

Art on the ceilings of the Venetian.

A larger than life vase of flowers in the lobby of the Golden Nugget.

An intricate design in the carpet of the MGM Grand.


One of the mascots from the Rainforest Cafe inside the MGM Grand.

A glass sculpture suspended from the parking area in front of the Mirage.

Orchids on the walkway at the Mirage.

Thursday, September 14, 2006

Our Trip to Las Vegas

We just got back from our trip to Las Vegas last night. We flew to Vegas on Sept. 8.

This was our first trip to Vegas. We thoroughly enjoyed ourselves. We ate good food, met some wonderfully friendly local people, and walked, and walked, and walked.

We saw two shows--one of which was Mamma Mia. This show was the highlight of the trip!

I also loved the palm trees. I know that palm trees are not native to Vegas and all the palm trees I saw there had been imported. The palm trees made the location seem that much more tropical. The different varieties of palms seemed endless!


We met some wonderfully friendly and interesting locals while in Las Vegas. Just like the palm trees, many of them were "imported" to Vegas and added to the colour and liveliness of the city.

One of my favorite attractions was the fountains at the Bellagio. The choreography of these fountains to the music was magnificent.

My favorite of the themed hotels from the exterior was New York New York. My husband says I took more pictures of this hotel than any other. I still marvel at the size of the hotel and how small I felt walking past it.


One of the hotels that my husband and I fell in love with was the Luxor--the Egyptian themed hotel. I would have loved to stay in a room in the pyramid! Perhaps next time.

I managed to find a couple of friendly faces..................


................and so did my husband!


Wonderful memories of a wonderful vacation!

Wednesday, September 6, 2006

Sand Castles

The following are some of the sand castles at a world class sand sculpture competition that is being held near here.

These pictures were sent to me by my aunt who lives two provinces away. I am always amazed at the magnificent pictures that people send me from far away of things that I have never seen that are literally located in my backyard!


Posted by Picasa

Monday, September 4, 2006

PieceMakers Quilt Guild Challenge - More Progress

Thank you to all who posted comments or e-mailed me with your suggestions for the border treatment on my challenge quilt. There were many great suggestions - many of which I will be saving for use in future quilts.

I will be including the inspiration photo on the label for the back of this quilt. Labels have to be covered for the voting of the quilts on guild night. I am going to ask if I can display my inspiration photo next to my quilt for the voting.

I love the suggestions for a piano key border or small rectangles "floating" in the border. (I am definitely going to use this idea on a future quilt!) However, I only had one fat quarter of the challenge fabric and I used all but one small piece to do the centre of the quilt. I felt I should be including the challenge fabric in the border if I were going to do a piano key or rectangle border so I passed on these ideas for now.

If I had more time, I would have done my zig-zag down the quilt in quarter circles or drunkard's path blocks. Because I have such precious little time to finish this, the more complicated curved piecing was out. I also considered something like this for the border but a lack of time ruled it out.

I liked the suggestion of putting the theme of the challenge, "The Beauty of the Earth " in words on the border. I tried using the embroidery alphabet feature on my sewing machine to put the words in the border. However, after some fiddling and experimenting, I felt I should spend more time familiarizing myself with this feature on my machine before attempting to include words on the front of my quilts. Because of the small size of the quilt, Tonya's free form letters were ruled out on this one.

Linda J. thought that a narrow black border followed by a wider red border might work. I ended up with just that--a narrow black border and I found the perfect "tulip" tone on tone red fabric for the outer border. Linda also sent me a link to the words for the hymn, "For the Beauty of the Earth". I had not made the connection to that hymn until that point. I will be using this hymn as part of my label.


I tried to take a picture of the border red tone on tone fabric - it looks more orange in this picture than it is in real life.


This is how the quilt looks with the borders added. The top has been quilted and is now ready for the binding, label, and hanging sleeve. Good progress for this weekend. Posted by Picasa

Friday, September 1, 2006

PieceMakers Quilt Guild Challenge - Progress

Remember this fabric? This was the fat quarter that was distributed to guild members for our fall quilt show challenge. The theme of this challenge is, "The Beauty of the Earth".


I knew when I saw these pictures, that I had the inspiration for my challenge piece.


Because I am not gifted in art quilts or free form / original design, I needed a pattern that could be pieced simply. I chose the rail fence design. I can see ribbons of colour in the fields of tulips in the photo. I have tried to duplicate what I saw in the photo into the design of my quilt.

I am now at the stage where I must decide on a border treatment. The photo below is my quilt so far--it is the centre of the quilt. Please ignore the black surrounding the piece--this is not a border. I took the photo against a black piece of fabric. The dark zig zag next to the red zig zag looks black, but is actually deep purple. There is no black on this quilt so far.


Do you have any suggestions for borders? Posted by Picasa